
Use Microsoft’s Media Creation Tool to ensure you have a Windows 10 boot drive handy should you ever run into issues with your current PC.
Besides an empty 8GB USB drive and a Windows PC, you’ll need to set aside roughly 30 minutes, maybe longer, depending on your internet speed.
To be clear, it’s possible to use a Mac to create a Windows 10 boot drive, but the process is fairly technical and requires familiarity with Terminal, the Mac’s command-line tool. It’s not a process that I’d recommend for the average user. I recently built my first gaming PC, and despite my mild comfort level with Terminal, I still found a using Windows computer to be a safer and easier process.
Use Microsoft’s media creation tool
Microsoft has a dedicated tool that you can use to download the Windows 10 system image (also referred to as ISO) and create your bootable USB drive.
1. Get started by going to this page and clicking on Download tool now.
2. Once the download finishes, double-click the file called MediaCreationToolxxxx to run it. (The last four digits of the file name indicate the version number of Windows 10. Right now, the filename is MediaCreationTool1909, but that will change as newer versions are released.) The file should be in your Downloads folder.
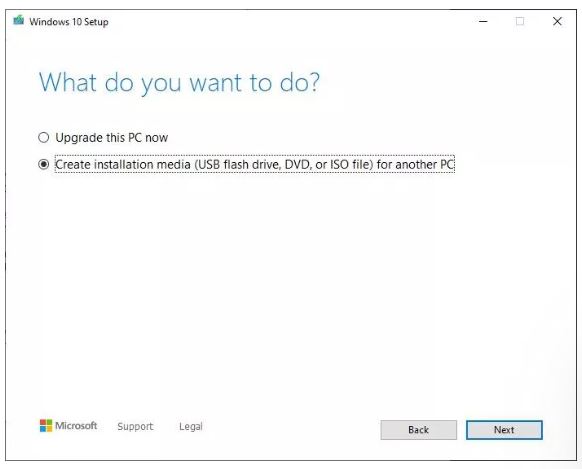
Select Create instllation media from the short list of options.
Screenshot by Jason Cipriani/CNET
3. Accept Microsoft’s terms and conditions, select Create installation media (USB flash drive, DVD, or ISO file) for another PC, and click Next.
Screenshot by Jason Cipriani/CNET
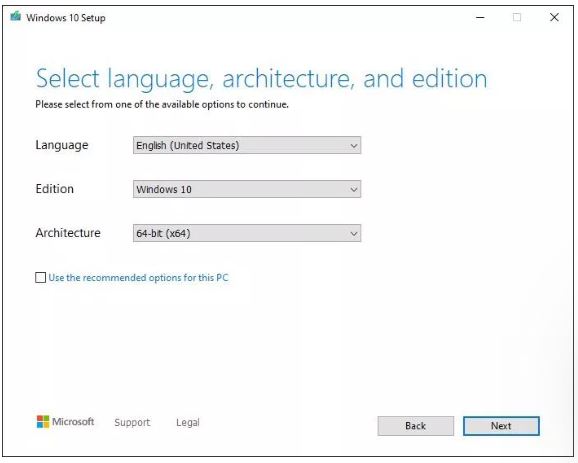
4. You’ll be asked to select the language, edition and architecture you want to use. By default, the tool will use the best options for the PC you’re creating the boot drive on. You can change any of the options by unchecking the box next to Use the recommended options for this PC and using the drop-down options. If you’re unsure about whether you need a 64-bit or a 32-bit architecture, select Both from the Architecture drop-down.
Screenshot by Jason Cipriani/CNET
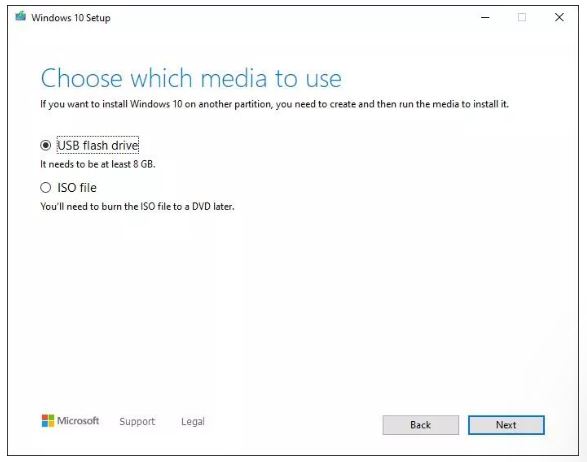
5. Click Next when you’ve adjusted the options, leave USB flash drive selected, and plug your USB drive into your computer. Select Next to continue.
Screenshot by Jason Cipriani/CNET
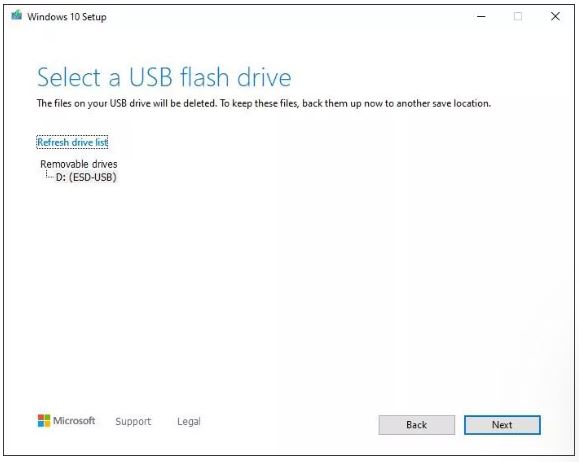
6. Finally, select the USB drive from the list. If you have more than one drive connected to your computer and are unsure which one to pick, disconnect the extra drives. With the right drive selected, click Next.
Screenshot by Jason Cipriani/CNET
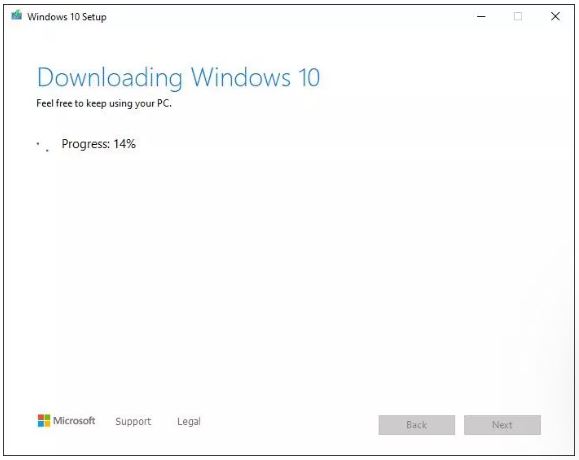
Microsoft’s tool will take care of the rest from there. Go get a drink, take a walk or browse the internet while the tool does its job. Again, the process should take about 30 minutes, give or take, depending on your internet speed.
When the tool is done, click Finish and remove the USB drive from your computer. Going forward, if you need to install or reinstall Windows, you can connect the drive to your computer and reboot it. Your PC should boot to the drive, giving you the option to install Windows.
If that doesn’t happen, you’ll need to reboot your computer into its BIOS firmware — usually done by pressing Esc, F2, or a similar key while the computer is starting up — and change the boot drive or “bootmenu” to your flash drive. The process for each computer (or motherboard if you’re building a gaming PC) will be different. I suggest consulting your manual for instructions.
You can also use the media tool to upgrade from Windows 7 to Windows 10, following these instructions. After getting Windows 10 installed, here are some tips to help get you started. If reinstalling Windows 10 feels like too much, use these tips to troubleshoot and speed it up.
Credits to: Jason Cipriani
Source: https://www.cnet.com/how-to/creating-a-windows-10-boot-drive-is-easy-peasy-heres-how/


Leave a Reply